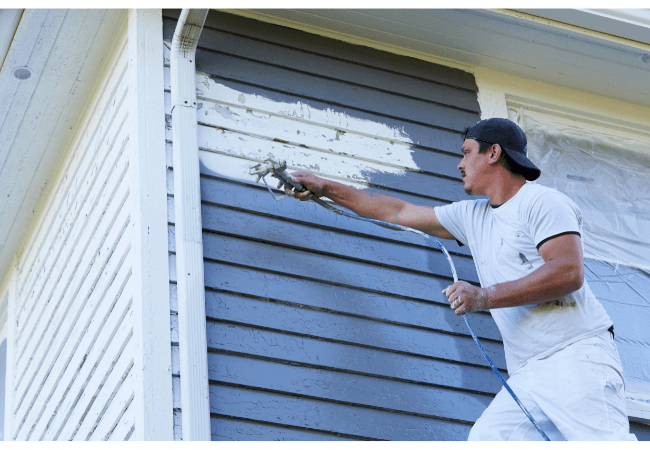
Painting your house can be a thrilling and intimidating task. One of the best ways to do it is by using a sprayer; it’s faster and gives a smoother finish. In this article, we will go through the steps involved in painting your house exterior using a sprayer, from gathering the tools and materials to mastering the spraying technique.
Before you start your painting journey, make sure your house exterior is ready. This means cleaning and repairing any imperfections, like cracks and peeling paint. Working with a prepared surface will give you a professional-looking result. Once your house exterior is ready, it’s time to learn the proper spraying technique to apply the paint evenly and efficiently.
With the knowledge of the benefits of using a sprayer, tools, and materials, and proper technique, you’re now ready to transform your house exterior with a fresh coat of paint. Follow the post-spraying procedure, and your newly painted house will look great and last for years to come.
Contents
Key Points
- Using a sprayer gives an efficient, smooth finish when painting house exteriors
- Proper preparation and surface repair are key to professional results
- Learning the spraying technique and understanding the post-spraying procedure is key to a successful project
Benefits of Using a Sprayer for Exterior House Painting
Painting a house exterior with a sprayer has many advantages over traditional methods like brush and roller painting. Some of the benefits are:
- Efficiency: Sprayers can cover more surface area in less time compared to brushes and rollers. This means the overall project time is reduced.
- Smooth Finish: Sprayers give a more uniform and flawless finish, free from brush or roller marks, thus making the house look better.
- Easier Access: Sprayers can reach tight spaces, corners, and uneven surfaces that are hard to paint with a brush or roller.
Using a sprayer for your exterior house painting project can also save you money. Sprayers use paint more efficiently, minimize paint waste and reduce the number of coats needed for complete coverage. Also, the time saved by using a sprayer can translate to lower labor costs. Professional painters may charge less for their services since they can finish the project faster.
In summary, using a sprayer for exterior house painting has multiple benefits, including efficiency, smoother finish, easier access to hard-to-reach areas, and potential cost savings. These benefits make a sprayer a good option for homeowners who want professional results with minimal time and effort.
Tools and Materials
Choosing the Right Paint Sprayer
Choosing the right paint sprayer is crucial for a successful exterior painting project. There are three types of paint sprayers: airless, HVLP (High Volume, Low Pressure), and air-assisted airless. To decide which one to use, consider the following:
- Airless sprayers are best for large projects and surfaces with irregular shapes, like siding and fences. They give a thick, even coat of paint fast.
- HVLP sprayers are for detailed work and smaller surfaces. They have more control and less overspray, good for trims and moldings.
- Air-assisted airless sprayers combine the benefits of airless and HVLP systems, with more precision and speed. They work well on large surfaces with intricate details.
Preparing the Paint Supply
Before you start painting, prepare the necessary materials for efficient work. These include:
- Paint: Choose high-quality exterior paint, and make sure it’s compatible with the sprayer.
- Thinner: Some paint sprayers require the paint to be thinned. Check the manufacturer’s recommendation for the proper thinning ratio.
- Strainer: Use a paint strainer to remove impurities and prevent nozzle clogs.
- Protective drop cloths: These will keep the work area clean and protect surrounding surfaces from paint splatters.
Safety Gear and Equipment
Safety should always be a priority in a painting project. Wear the necessary safety gear and use the right equipment to avoid accidents and exposure to harmful substances. Key safety items are:
- Respirator: Protects from inhaling paint fumes and particulates. Use a respirator with a combination of organic vapor cartridges and particulate filters.
- Protective eyewear: Safety goggles or glasses reduce the risk of paint or debris getting into your eyes.* Gloves: Nitrile or latex gloves for your hands from paint and chemicals.
- Coveralls or old clothing: Disposable coveralls or old clothing to protect your skin from paint.
- Ladders and scaffolding: Make sure all ladders and scaffolding are stable and secure before starting work.
Remember to store paint and materials according to the manufacturer’s instructions and dispose of waste properly. Following the right safety measures and using the right tools will contribute to a successful and efficient house exterior painting project.
House Exterior Preparation
Cleaning and Sanding Surfaces
Before painting, clean and sand all surfaces of your house exterior. For efficient cleaning, use a pressure washer to remove dirt, dust, and loose debris from the walls. Afterward, inspect the surfaces for chipping or peeling paint and sand them using a 120-grit sandpaper. This will ensure proper adhesion of the new paint and a smooth finish.
- Pressure wash the walls
- Inspect for chipping or peeling paint
- Sand surfaces with 120-grit sandpaper
Protecting Windows and Doors
When painting with a sprayer, you need to protect your windows and doors from overspray damage. To do this, cover them with heavy-duty plastic sheeting or drop cloths. Make sure to secure the edges with painter’s tape to prevent paint from seeping under. Do not use masking tape, it may damage the surface when removed.
- Use heavy-duty plastic sheeting or drop cloths
- Cover windows and doors completely
- Secure edges with painter’s tape
Priming the Surface if Necessary
Priming the surface is necessary in some cases, such as:
- The surface is bare wood or has been sanded down to bare wood
- The previous paint is a dark color, and you’re applying a lighter color
- The surface has stains, marks, or patches that need coverage
In these cases, apply a high-quality primer designed for exterior surfaces. Make sure it’s compatible with your chosen paint type. The primer acts as a barrier and ensures proper bonding between the paint and the surface.
Remember to let the primer dry according to the manufacturer’s instructions before painting with your sprayer.
Spraying Technique## Spraying Technique

In this section, we will discuss the various aspects of using a sprayer to paint a house exterior. We will cover:
Adjusting the Sprayer
Before you start painting, adjust your sprayer as follows:
Choose the right tip size: Refer to the paint manufacturer’s instructions to choose the right tip size for the paint you are using.
Set the pressure: Start at a lower pressure and increase until you get an even spray pattern without overspray.
Test your settings: Practice on scrap material before painting the house to make sure the settings are correct.
Master the Spray Patterns
To get an even and professional finish, master the spray patterns:
- Horizontal pattern: Hold the sprayer horizontally and move from side to side, starting and ending with a lead-in and lead-out to get even coverage.
- Vertical pattern: Hold the sprayer vertically and move up and down, use the same lead-in and lead-out for consistent coverage.
- Overlap: Overlap each pass 50% to get complete coverage without gaps.
Remember, practice makes perfect. Take your time to learn these techniques.
Maintain a Consistent Distance
Lastly, maintain a consistent distance between the sprayer and the surface:
- Ideal distance: 12-14 inches from the surface.
- Maintain the distance: Keep your arm straight and move your whole body horizontally or vertically while spraying, don’t just bend your wrist.
- Adjust as needed: Pay attention to the spray pattern on the surface and adjust your distance if you see uneven coverage.
By following these guidelines and tips, you will be well on your way to mastering the spraying technique for painting house exteriors with a sprayer.
Application Tips
Optimal Environmental Conditions for Spraying
When painting a house exterior with a sprayer, consider the environmental conditions to get the best results. Ideal conditions are:
- Temperature: 50°F (10°C) to 90°F (32°C), extreme heat or cold can cause the paint to react badly.
- Humidity: Choose a low-humidity day (40-70%) to help the paint dry faster and more evenly.
- Wind: Calm days with minimal wind are best to prevent overspray and debris from blowing onto the wet paint.
Layering the Paint
Even coverage is key to a professional finish. Follow these guidelines for smooth, consistent layers:
- Pressure: Make sure the sprayer is set to the right pressure for the paint being used. Refer to the paint manufacturer’s instructions.
- Distance: Maintain a distance of about 12 inches (30 cm) from the surface. Too close will cause paint buildup, too far will cause uneven coverage.
- Speed: Move the sprayer at a steady speed, don’t pause in one spot for too long. This will prevent drips and uneven layers.
Pro tip: Test the sprayer and practice your technique on a large piece of cardboard or scrap wood before starting on the house exterior.
Overlap and Paint Coverage
To get full paint coverage and avoid unsightly lines or streaks, pay attention to overlap and coverage areas:
- Overlap: When spraying, overlap by 50% from the previous pass. This will give even coverage and minimize streaks or lines.
- Edges: For areas the sprayer can’t reach, such as corners and edges, use a high-quality brush or roller to apply paint manually.
- Coverage area: Check the paint specifications for the recommended coverage area per gallon or liter. This will ensure you buy the right amount and avoid waste or inadequate coverage.
By following these application tips and working in optimal conditions, your house exterior painting project will look professional, and the paint will be a long-lasting protective layer.
Post-Spraying Procedures
Cleaning the Sprayer
After painting the house exterior with a sprayer, make sure to clean the equipment. This will keep the sprayer functional for future projects and prevent clogging or paint buildup. Follow these steps to clean the sprayer:
- Disconnect the sprayer from the paint container and trigger it until the remaining paint is cleared from the hose.
- Fill a bucket with warm water for water-based paints or a cleaning solvent for oil-based paints
- Attach the water/solvent container to the sprayer and run it until the liquid runs clear.
- Disassemble the sprayer, pay attention to the nozzle and hose.
- Clean each part individually with a soft brush, warm water, or solvent.
Inspect for Missed Spots or Drips
After the house exterior painting is done, let the paint dry according to the manufacturer’s instructions. After the paint is dry, inspect the surface for any missed spots, uneven paint coverage or drips. Look out for:
- Inconsistent paint thickness
- Paint drips or runs
- Uneven or patchy paint coverage
- Areas where the primer is visible
Fix any imperfections by lightly sanding the area and applying an additional coat of paint with a brush or roller for better control and precision.
Disposing of Paint and Solvent Wastes
Proper disposal of paint and solvent wastes is important for the environment and local regulations. Follow these guidelines to dispose of painting materials:
- Never pour unused paint or solvents down the drain. It can contaminate water sources and harm the environment.
- Collect any paint chips, residue, or cleaning materials in a sealed container.
- Check with your local waste management facility for instructions on disposing of hazardous materials.
- Recycle empty paint cans whenever possible.
By following the above post-spraying procedures, you can maintain your sprayer and have a professional-looking paint job on the exterior of your house.


Leave a Reply